It’s always DNS (why domain transfers suck)
It’s a popular meme that all mysterious internet problems are caused by issues with the Domain Name System (DNS). Like most memes, it gets over-used, but when it comes to transferring a domain between providers, the intricacies of DNS create some very real problems.
To make things easier, we’ve just rolled out a new feature to our DNS management system that allows you to fetch records from your old provider’s nameservers prior to transferring the DNS for your domain to us.

Why is this needed?
This functionality can help achieve a seamless transfer of your hosting, by working around an annoying feature of the DNS system.
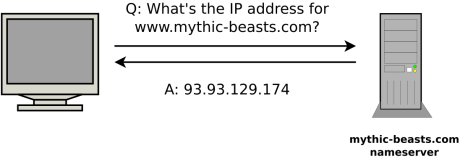
DNS is the system that converts internet names (like “www.mythic-beasts.com”) into IP addresses (like “93.93.129.174”) that can be used to locate the server for a particular service. This conversion is done by nameservers, and each domain has its own nameservers, usually provided by your hosting provider.
When you transfer the hosting for your domain between providers, you’ll need to update your DNS records to point at your new web and email servers, but you will also typically change from using your old provider’s nameservers to your new provider’s.
The simple way to transfer your domain is to do these two things in one go. Your old provider’s nameservers direct traffic for your domain at your old web and email servers, your new provider’s nameservers direct traffic at your new hosting service, so just change the nameservers for your domain from your old provider’s to your new provider’s and you’re done, right?
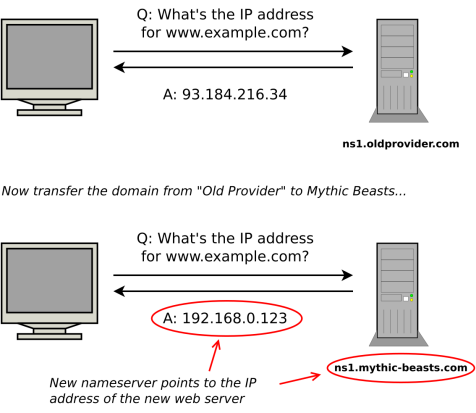
This approach works, but it’s not ideal for domains that are in active use because of the delays created by caching.
Caching and TTL
One of the things that makes DNS so confusing is caching. When you look up a name, you’re told to remember the answer for a set period of time. IP addresses don’t change very often, so looking up a name every single time you need it would generate a lot of unnecessary traffic, and slow things down.
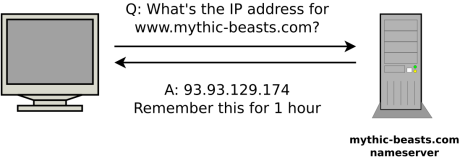
All DNS records have a “Time To Live” (“TTL”). This is the number of seconds that you’re allowed to remember it for before you have to do a new lookup to see if it’s changed. In the past, TTLs were usually set to hours, days or even a week. As the Internet has become faster, the overhead of DNS lookups has become less of a problem, and TTLs of one hour or a few minutes are now common.
Although caching helps improve performance in normal use, it creates a problem when you need to make changes. When you make a change to the DNS records for your domain, it won’t be picked up immediately by all users, because some people will have the old value cached.
If you know you’re going to need to change a DNS record, you can lower the TTL in advance (for example to 60 seconds), and then, when you come to change the record, all users will pick up the change very quickly.
If you’re planning to change hosting provider, it makes sense to lower the TTL on your DNS records in advance, so that when you come to make the change, all traffic is switched from the old provider to the new provider quickly.
Changing nameservers
When you have your own domain, you need to have some nameservers to answer DNS queries. As described above, when you transfer the hosting for your domain, you will typically also switch from using your old provider’s nameservers to your new provider’s.
The domain name system keeps a record of which nameservers provide the DNS for each domain. For example, DNS for mythic-beasts.com is provided by our nameservers (ns1.mythic-beasts.com and ns2.mythic-beasts.com). The problem is that these records are also subject to caching and usually have a fixed TTL of 48 hours.
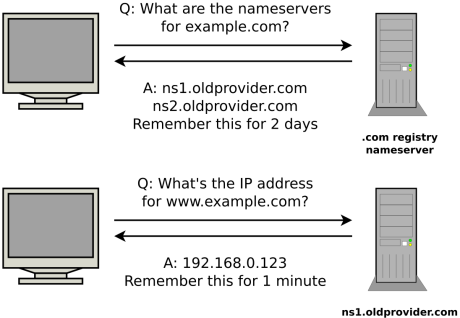
This means that even if you set a low TTL for your own records, when you change the nameservers for a domain, you have a two day period when queries for your domain might still end up at your old nameservers. If your old and new servers are serving different records, users will get a mix of different answers.
The trick to achieving a clean switch between hosting providers is to separate the move from your old provider’s nameservers to your new provider’s from changing the individual DNS records that control who provides your web and email hosting. In other words, get the old and new nameservers serving exactly the same records, so that during the 48 hour nameserver changeover period, it doesn’t matter which nameserver answers the query. Once that changeover is complete, you can switch your web and email hosting by updating low-TTL records.
Our new fetch live records feature makes it easier to copy the records from your old provider’s nameservers to ours, so that you can do a seamless nameserver handover before migrating your web and email hosting. Unfortunately, this tool can only check for commonly used records because there’s no reliable way to get a complete list. The best solution is to get an export of your current DNS records from your current provider, and use our import function, but many providers don’t have an export feature in their systems.
This stuff is hard – we’re here to help
Domain transfers, and DNS in general, are difficult and confusing. For many of our customers, changing providers is a once-per-decade thing, whereas we deal with domain transfers every single day.
We’re working hard to build tools that make the process easier, but our support team is always on hand to provide personalised help.