SSH key-based authentication
SSH key-based authentication is an alternative to entering a password when connecting to a remote server using SSH, SCP or SFTP. It has a number of advantages over password-authentication.
How it works
Rather than sending your password to the server that you're connecting to, the server will challenge you to prove that you are in possession of a private key that corresponds to a public key that has been previously lodged on the server.
When provisioning a new server with Mythic Beasts, you will based asked to provide an SSH public key. This will be added to the new server, allowing you to log in. Key-based authentication can also be used on our Hosting Accounts.
This page describes how to create an SSH key pair, and use it to login. The process is different depending on your platform:
- Linux, Mac OS X or other UNIX-like systems (using OpenSSH)
- Windows (using PuTTY)
OpenSSH (Linux & OS X)
To create an SSH key-pair using OpenSSH, use the ssh-keygen utility on the
command line.
Generate a key pair
The process will look something like this:
$ ssh-keygen
Generating public/private rsa key pair.
Enter file in which to save the key (/home/user/.ssh/id_rsa):
Enter passphrase (empty for no passphrase):
Enter same passphrase again:
Your identification has been saved in /home/user/.ssh/id_rsa.
Your public key has been saved in /home/user/ssh/id_rsa.pub.
You will be asked for the file to save the key in. If this is the first time you have created a key, you can accept the default location.
You will then be prompted for a passphrase. If you provide a passphrase, your private key will be encrypted. If you don't provide a passphrase then anyone who can get access to the private key on your computer can use it to log in to any system on which you have access. It is recommended that you use a strong password here.
ssh-keygen will generate a private key and public key, and will tell you
where they are stored. You should never share the private key. When you
provision a new server, you will be asked for your public key. This consists
of a few lines of text, and can be copy-and-pasted. You can view the contents
of the public key file using the cat command.
$ cat $HOME/.ssh/id_rsa.pub
ssh-rsa AAAAB3NzaC1yc2EAAAADAQABAAABAQC8rCWtK565pxA9l+9zZLrZ72WelaVrhkCJfyeqNUUhQOSn5EQhNVzhzLSDqfHryToYHt23mHCZb3EbgjxA37zxhjgH619IzoUhyrLU8meAGYpGXKwlttLo494B4WUYTSvKGYHqMJVZw7SGNNOd+/bKVBAP+jo80nbSDQ+Z875TN/UhlHDRZn/1nd7YO7f4Mw7GTqr5BGbITS/r69oIN+cYbg5+ajXFZLrTAe3GdVoCWrudie685Gd3BnjFNw+OdGpHYI/paCrpqrr3lvZcsHjxhrIwuDd3hYzKo1Xa/tKCHnzgNCgDfbJT4enadK8EmDC5bX8t72UeJ7360/uV+rAh user@mylaptop
You will be asked to enter your public key when provisioning a new server with
Mythic Beasts. Simply copy and paste the above when prompted (in the above
example, the copy and pasted text should start with, and include ssh-rsa and
end with user@mylaptop).
You can also enabled key-based authentication for an account that you currently
log into using a password. To do so, create a directory called .ssh in your
home directory, if it doesn't already exist, then add the above contents to a
file called authorized_keys.
Using your key
Your key should now be used automatically when you use ssh or scp to
connect to your server. You will be prompted to enter your passphrase,
assuming that you set one.
You will be asked for the passphrase for your private key, assuming that you set one.
PuTTY (Windows)
You will need to download and install PuTTY. You will need both putty itself, and the puttygen utility. Both will be installed if you use the standard Windows Installer package.
Generate a key pair
Once installed, open the puttygen utility, and press "Generate". You may be asked to move your mouse around to generate random data, but you should then see a screen similar to the one shown below:
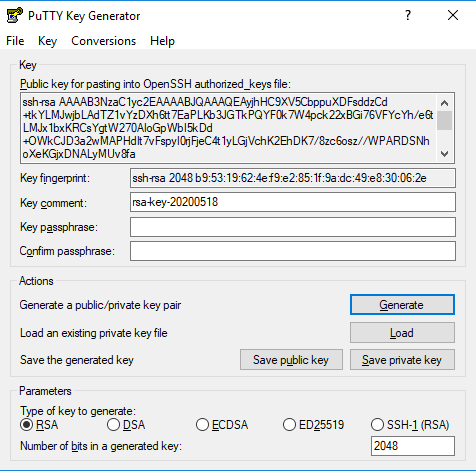
The data in the top box is your public key in the format that you will need to provide when provisioning a new server with Mythic Beasts. Simply copy and paste the full contents of this box into the box on our website when ordering a new server. Unlike your private key, which must be kept secret, the contents of the public key are not sensitive, and may be freely shared.
Save your key
You will need to save your private key, so that you can use it when connecting to your server. Before doing this, you should set a passphrase using the Key passphrase and Confirm passphrase boxes. The passphrase you enter here will be used to encrypt your private key. It is recommended that you provide a strong password here, as otherwise, anyone who can get access to your private key file will have access to all servers that you have access to using this key.
Use the Save private key button to save the key on your computer.
Retrieving your public key
It's not necessary to save the public key separately. If you ever need to access your public key again (for example, if you wish to provision a new Mythic Beasts server), simply use the Load button, open your private key, and after entering your passphrase, you will be shown the contents of your public key.
Do not ever send your private key file to anyone else. Always use the puttygen utility, and copy and paste the contents of the public key box.
Note that if you use the Save public key option, the format of the resulting file is not suitable for use when provisioning a server with us. You should instead open the private key, as described above.
Configure PuTTY
Once you have saved your private key, you can close puttygen, and open putty. The next step depends on which putty version you are using.
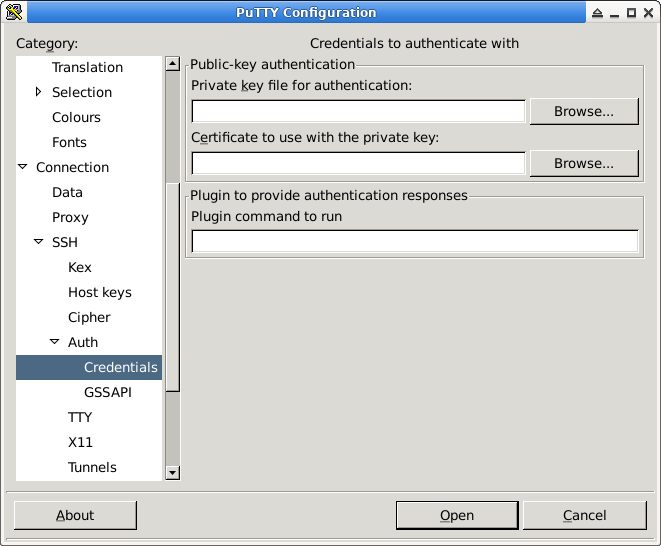
If you are using version 0.78 or more recent, then to use key-based authentication, go to Connection → SSH → Auth -> Credentials in the category tree:
For older versions, go to Connection → SSH → Auth in the category tree:
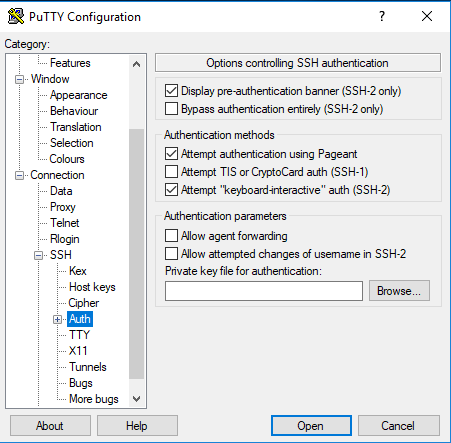
Use the Browse button to select the private key file that you saved in the previous step.
Connect to your server
You can now configure putty to connect to your server. Go to the Session section at the top of the category tree:
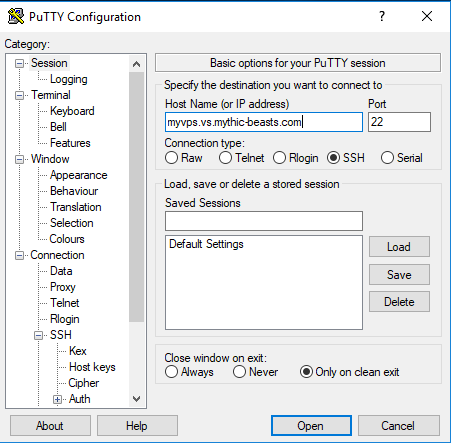
Enter the host name of the server you are connecting to. You should leave the port number set to 22, unless you are connecting to an IPv6-only server, and are on an IPv4-only connection, in which case you should use the hostname and port number provided for this in the control panel.
We recommend pressing "Save" to save these settings to avoid needed to reconfigure them again in future.
You can now press "Open" and you will be connected to your server. The first time you connect, you will be prompted to verify the identity of the server that you're connecting to. If you are paranoid, you can cross-check the details shown to you against those in the control panel, but most people will simply press "Yes".
You will be asked for your username, and the passphrase for your private key, and you will then be connected to your server.