Let's Encrypt SSL DNS validation
This page gives a step-by-step guide for issuing Let's Encrypt SSL certificates with DNS validation (dns-01) using our DNS API.
Most users will not need to use DNS validation in order to obtain a Let's Encrypt certificate.
- If you have a hosting account with us, you don't need to follow this guide. Support for Let's Encrypt is fully automated for hosting accounts, and you can enable a certificate for your website using our control panel.
- If you have a dedicated or virtual server, and are trying to obtain a Let's Encrypt certificate for your website, it is usually simplest to obtain a certificate using HTTP validation, rather than DNS validation.
Let's Encrypt is a service providing free SSL certificates, using domain validation to ensure that certificates are issued only to the legitimate owner of a domain. Let's Encrypt provide a number of options for performing domain validation. If you only need certificates for a web server, it's simpler to use the default web validation. For other applications, for example if you need a certificate for a mail server, DNS-based validation is ideal. It requires specific TXT records to be inserted into the DNS zone for a domain. This can be fully automated using our DNS API, as described on this page.
1. Create an API key
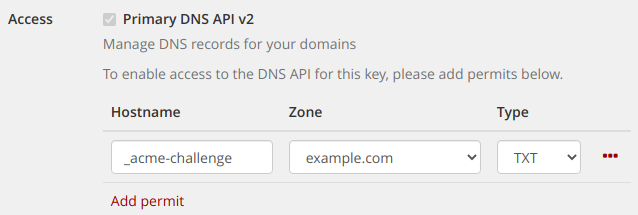
Go to the API keys section of the customer control panel and create a new API key with DNS permits for your domain. The key must be able to create a TXT record for the hostname _acme-challenge.
If you need multiple alternative names included in a certificate, you must create separate _acme-challenge records for each alternate name.
To include both example.com and, subdomain.example.com, you will need to allow access for _acme-challenge and, _acme-challenge.subdomain
We recommend creating a restricted key that is only able to do this, as shown below:
Once done, you should make a note of the API Key ID and API Key Secret.
When requesting a new certificate, dehydrated will create a temporary DNS record using this key that is used to validate the certificate request. The record is automatically deleted after use.
2. Install dehydrated
Our code is a hook for the dehydrated client. Dehydrated is packaged for Debian and is included as a standard package from Debian Stretch onwards.
You'll also need the dig utility.
apt-get install dehydrated dnsutils
3. Download the Mythic Beasts hook script
The hook script is a script that makes the necessary requests to our DNS API. Download it from the git repository to /etc/dehydrated:
cd /etc/dehydrated
git clone https://github.com/mythic-beasts/dehydrated-mythic-dns01.git
4. Configure required certificates
Create /etc/dehydrated/domains.txt containing one
line for each certificate required. Each line should start with the
name of the domain, followed by any aliases (alternate names) that you want
included in the certificate under that domain. For example:
example.com www.example.com
example.net www.example.net subdomain.example.net
5. Create password file
Create /etc/dehydrated/dnsapi.config.txt containing the DNS API Key details for each domain.
This file should have one domain per line, with the name of the domain,
followed by the API Key ID and Secret separated by a space (making sure that
there is a newline at the end of the file).
Note that the first field must be the name of the DNS zone, as shown in the "Zone" column for your API key above.
example.com ucykkqh8srztsn7b bL4jnTjPIHNXFOgaLC6SA1-QWp4l0J
example.org ucykkqh8srztsn7b bL4jnTjPIHNXFOgaLC6SA1-QWp4l0J
If you are using the same key for multiple domains, you should repeat the details for each domain, as shown.
It is recommended to limit access to this file:
chmod 0600 dnsapi.config.txt
If you want to put this file elsewhere, put the path to the file in
MYTHIC_DNS_CONFIG
6. Configure dehydrated to use the hook script
echo HOOK=/etc/dehydrated/dehydrated-mythic-dns01/dehydrated-mythic-dns01.sh > /etc/dehydrated/conf.d/hook.sh
echo CHALLENGETYPE=dns-01 >> /etc/dehydrated/conf.d/hook.sh
echo HOOK_CHAIN=yes >> /etc/dehydrated/conf.d/hook.sh
You should also configure your email address. Let's Encrypt will email a warning if a certificate is nearing its expiry date and has not been renewed.
echo CONTACT_EMAIL=<i>me@example.com</i> > /etc/dehydrated/conf.d/mail.sh
7. (optional) Test with the Let's Encrypt staging service
The Let's Encrypt API limits the number of certificates that you can issue each week. For testing, you may wish to use the staging service. To do this:
mkdir /tmp/dehydrated
echo CA=https://acme-staging-v02.api.letsencrypt.org/directory > /etc/dehydrated/conf.d/staging.sh
echo BASEDIR=/tmp/dehydrated >> /etc/dehydrated/conf.d/staging.sh
Once you have finished testing, delete this file.
8. Register your Let's Encrypt account
Register your Let's Encrypt account and accept the terms:
dehydrated --register --accept-terms
9. Generate initial certificates
Invoke dehydrated:
dehydrated -c
This can take a little while to run, especially if you have multiple certificates. Our DNS API only updates new records once a minute, and we have to wait separately for the challenges for each certificate to go live.
If successful, the requested SSL certificates are placed in /var/lib/dehydrated/certs
10. Configure your software to use the certificate
You will need to configure your web server, mail server, or whatever software you intend to use with your certificate. You can get configuration examples for many common packages on ssl-config.mozilla.org.
When using these samples, make the following substitutions:
/path/to/signed_cert_plus_intermediates=>/var/lib/dehydrated/certs/YOURDOMAIN/fullchain.pem/path/to/private_key=>/var/lib/dehydrated/certs/YOURDOMAIN/privkey.pem
11. Configure certificate renewal
You will need to arrange for dehydrated -c to run regularly. It will renew any certificates that are due to expire in the next 30 days.
Copy and paste the following into a terminal to create a cron job and set up log rotation.
cat > /etc/cron.daily/dehydrated <<EOF
#!/bin/sh
exec /usr/bin/dehydrated -c >> /var/log/dehydrated-cron.log 2>&1
EOF
chmod 0755 /etc/cron.daily/dehydrated
cat > /etc/logrotate.d/dehydrated <<EOF
/var/log/dehydrated-cron.log
{
        rotate 12
        monthly
        missingok
        notifempty
        delaycompress
        compress
}
EOF